Performative Reverb Using the Chase Bliss CXM 1978
Plenty of people have a set-it-and-forget-it mentality when it comes to reverb, and that's fine and dandy. But there is a whole world of exploration there that can happen in real-time. Sometimes while recording, I venture into sound design world. Meaning it's as much about the sound and the feeling, as it evolves, as about the part-writing. And then, which reverb I choose and which particular settings become essential.
In this article, I will discuss sculpting tone with reverb, where the tweakability of your reverb is just as important as the guitar or amp you choose.
Ground Floor
Let's start with our foundational reverb tone. There are a lot of reverb pedals on the market these days that cover a lot of realms of reverb from spring to hall. Unfortunately, I have bonded with few digital pedal reverbs. Reverb is one of those areas that studio racks still excel at in the tone department. My ears have a hard time with generic or overly digital sounds.

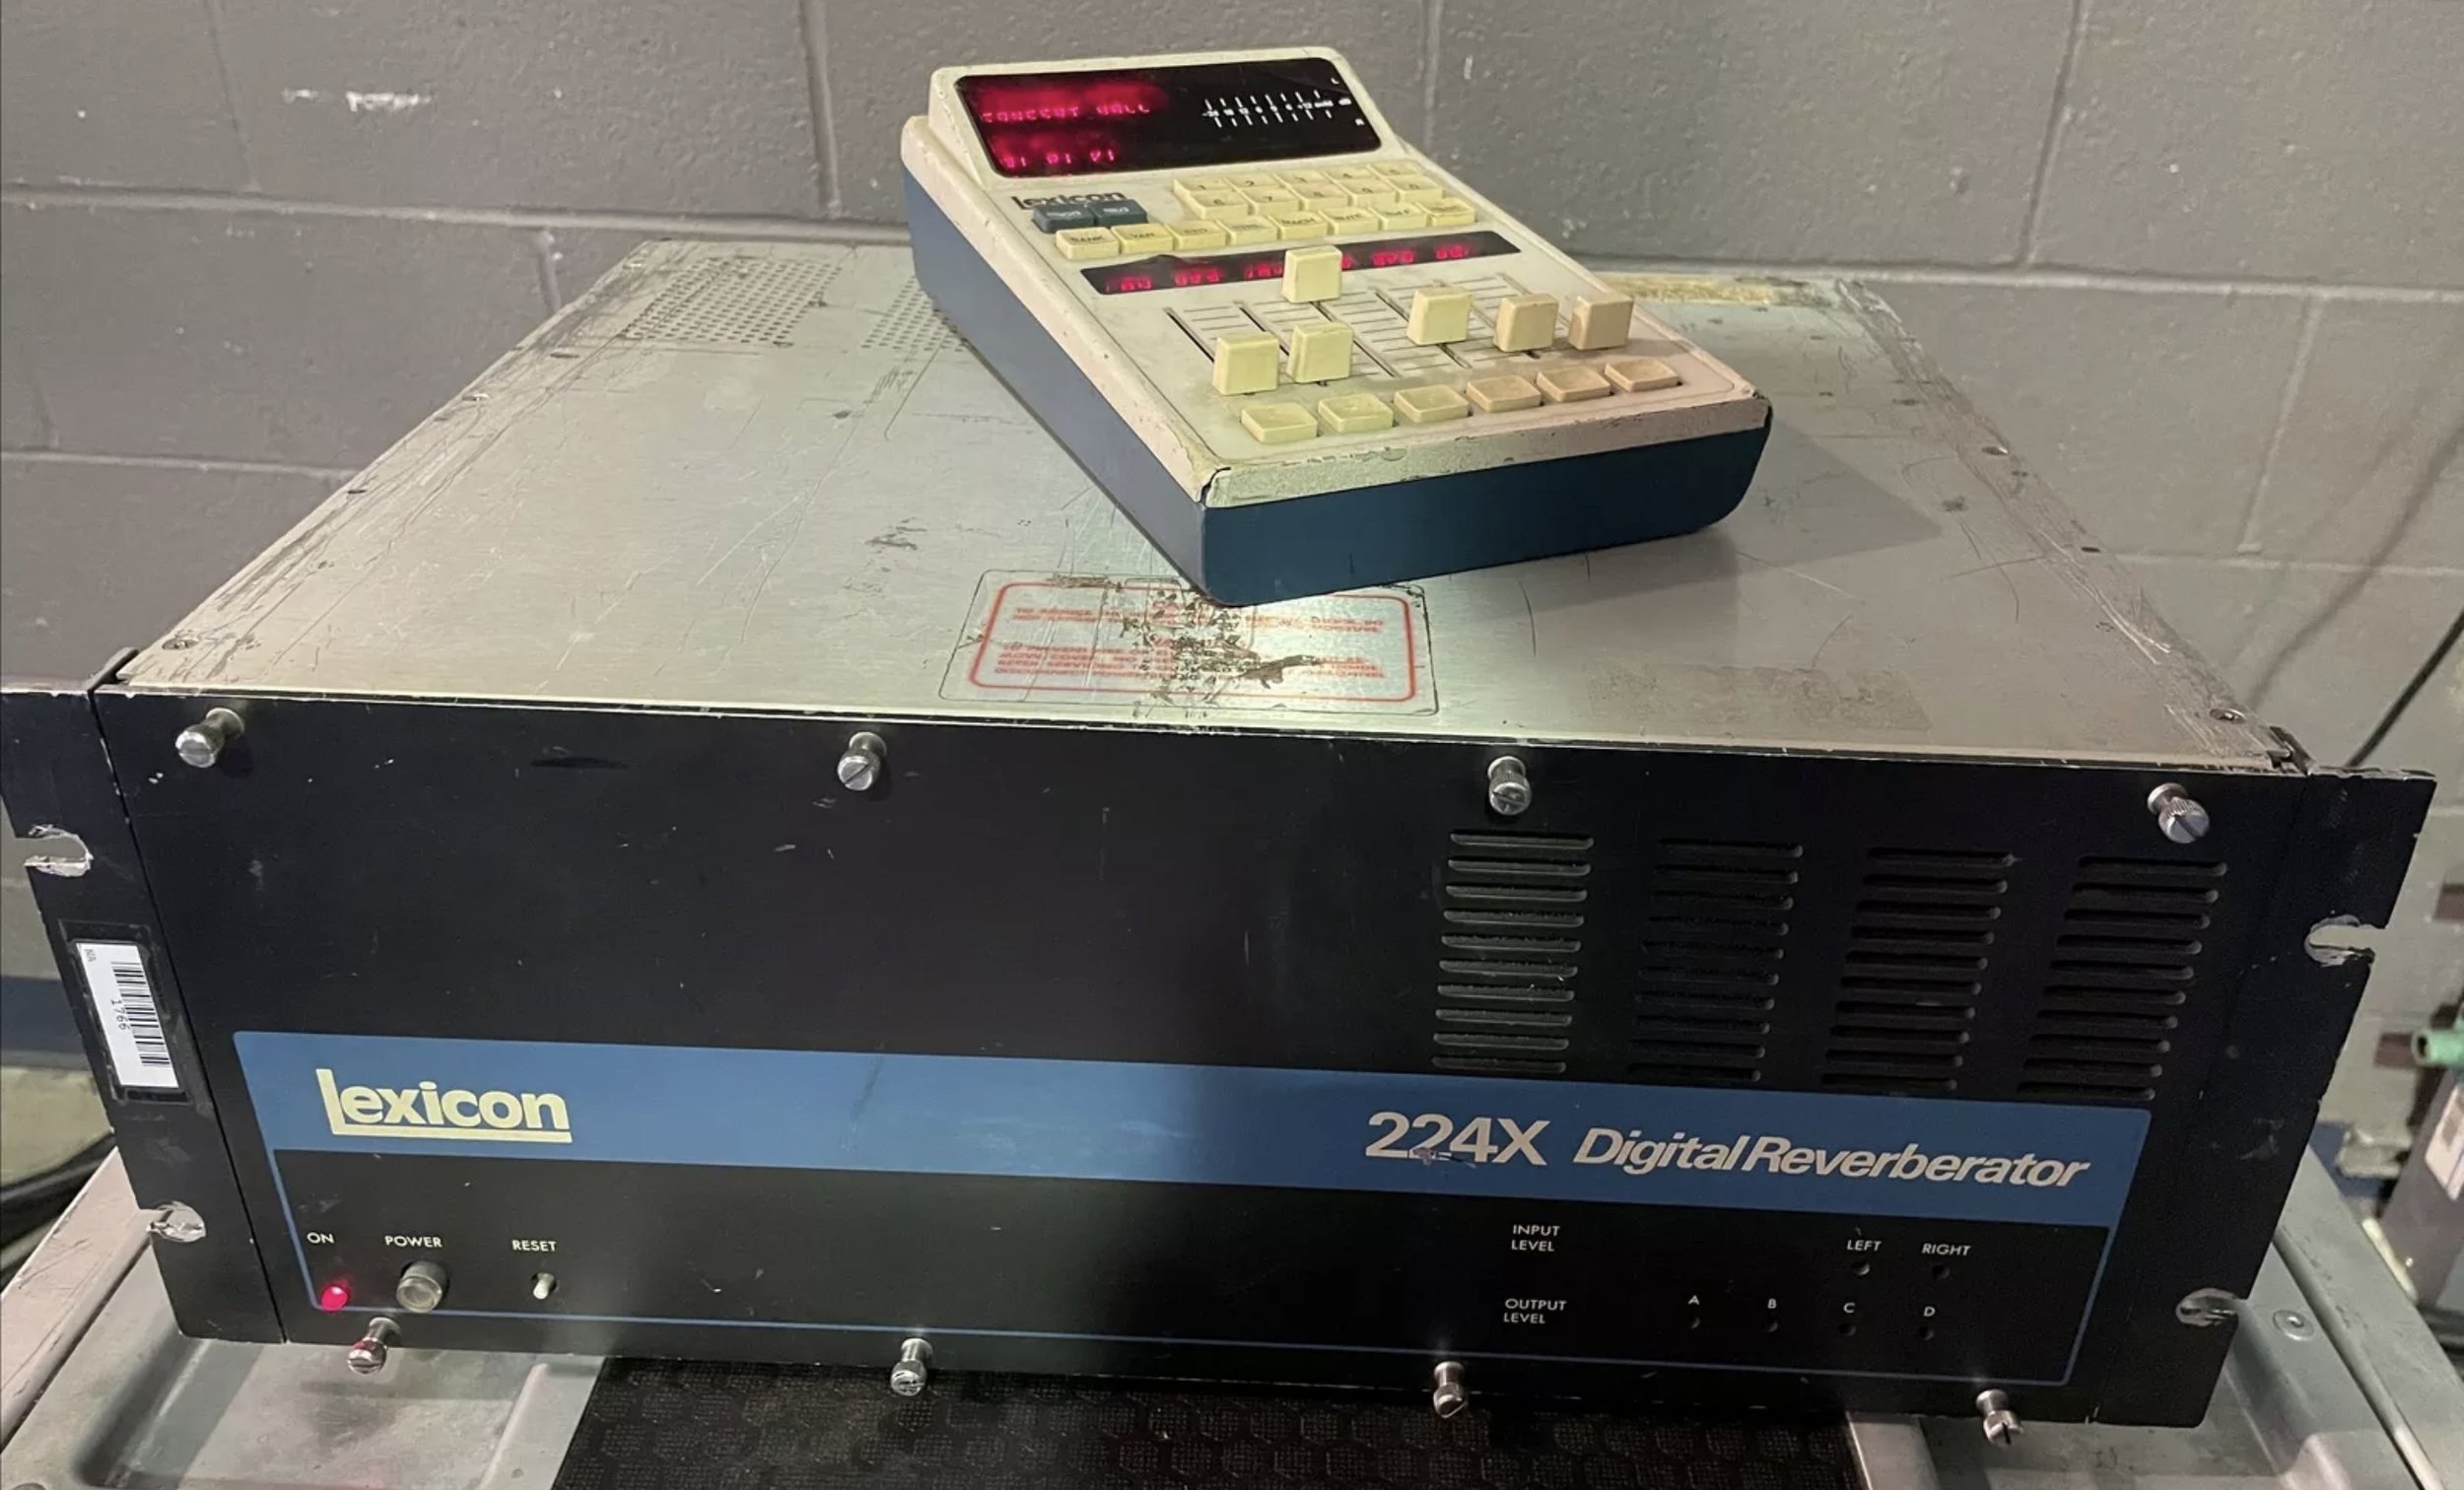
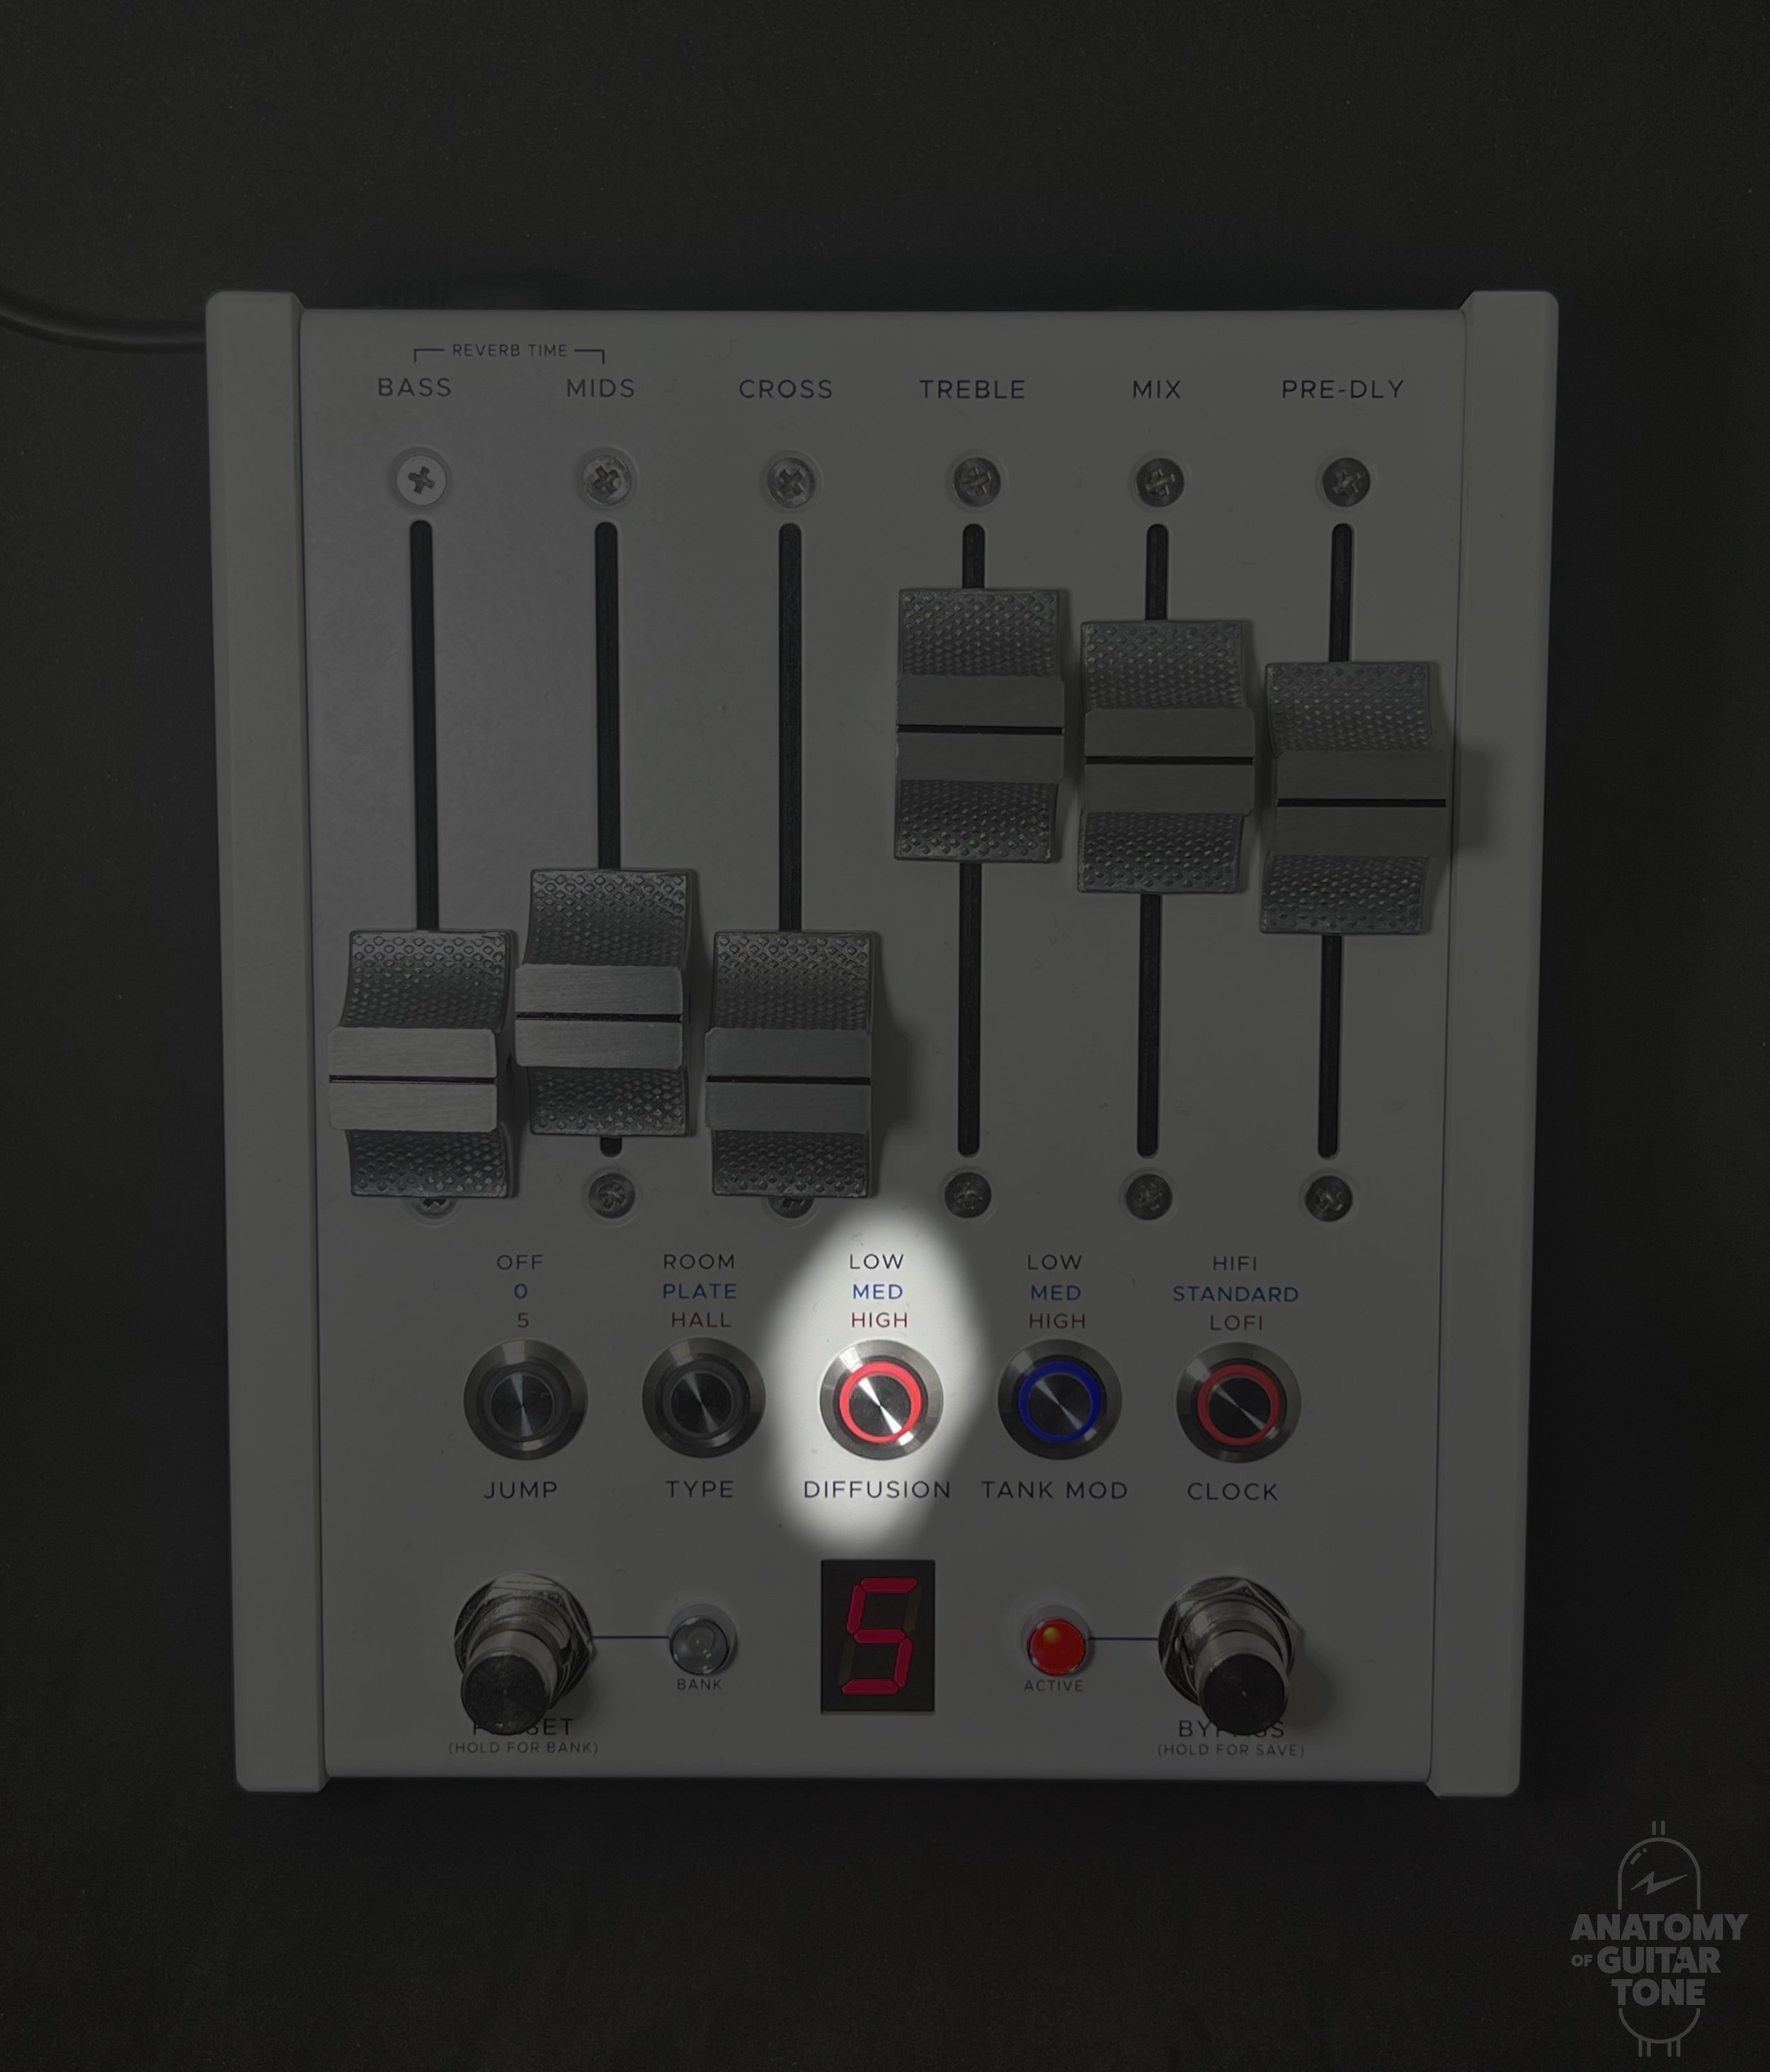
I'm not anti-digital. I grew up with the sounds of digital reverb like the Lexicon 224 and PCM series. Those reverbs have flavor and character, though. I found flavor missing from many of the modern digital reverb pedals from Strymon and Eventide. Then I discovered the Chase Bliss CXM 1978. The CXM 1978 is inspired by the Lexicon 224, which debuted in 1978 and appeared on countless classic albums.
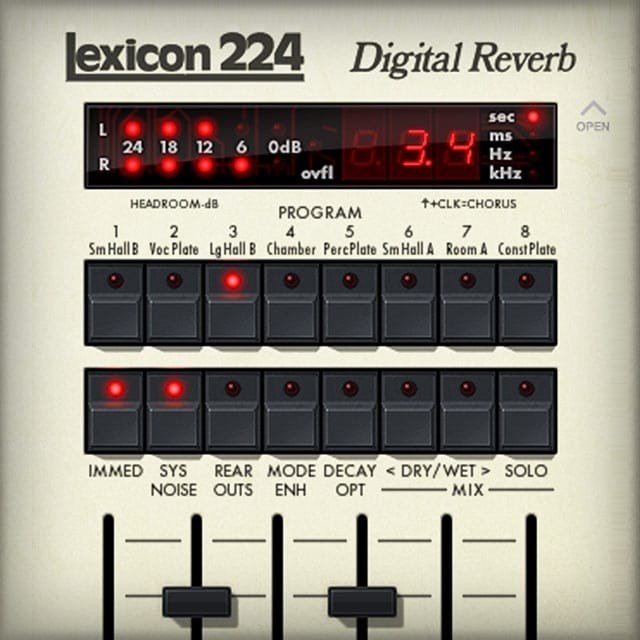
The Chase Bliss CXM 1978 is the first digital reverb pedal (with an analog heart) that I actually like to print to a recording. Of course, I’ve printed the Big Sky and other reverbs. But they always left me feeling like I needed something else, or wishing I could just run my guitar through an actual Lexicon 224. So I started using the Universal Audio Lexicon 224 plugin. The UAD 224 sounds fantastic and is a pretty excellent re-creation. But you can't tweak it in real-time without a mouse and you can’t put it on a pedalboard.
Real-Time
“You can ride the length parameter to extend or shorten the reverb trail.”
So what is a performative reverb? Think of it as playing the reverb parameters in real-time. The most basic example is adjusting reverb in real-time. Adjusting as you are playing, you can tweak the length of the reverb trail.
Some reverbs allow you to create infinite sustain, such as the CXM 1978. But you may want endless sustain on some sections of a song and not on others. In that case, you’d want to ride the length parameter to extend or shorten the reverb trail.
The CXM 1978 is a perfect tool for this, as it includes faders designed into the pedal that are really easy to touch and adjust. Many reverb pedals have a knob dedicated to length, but a knob isn't as easy to control as a fader.
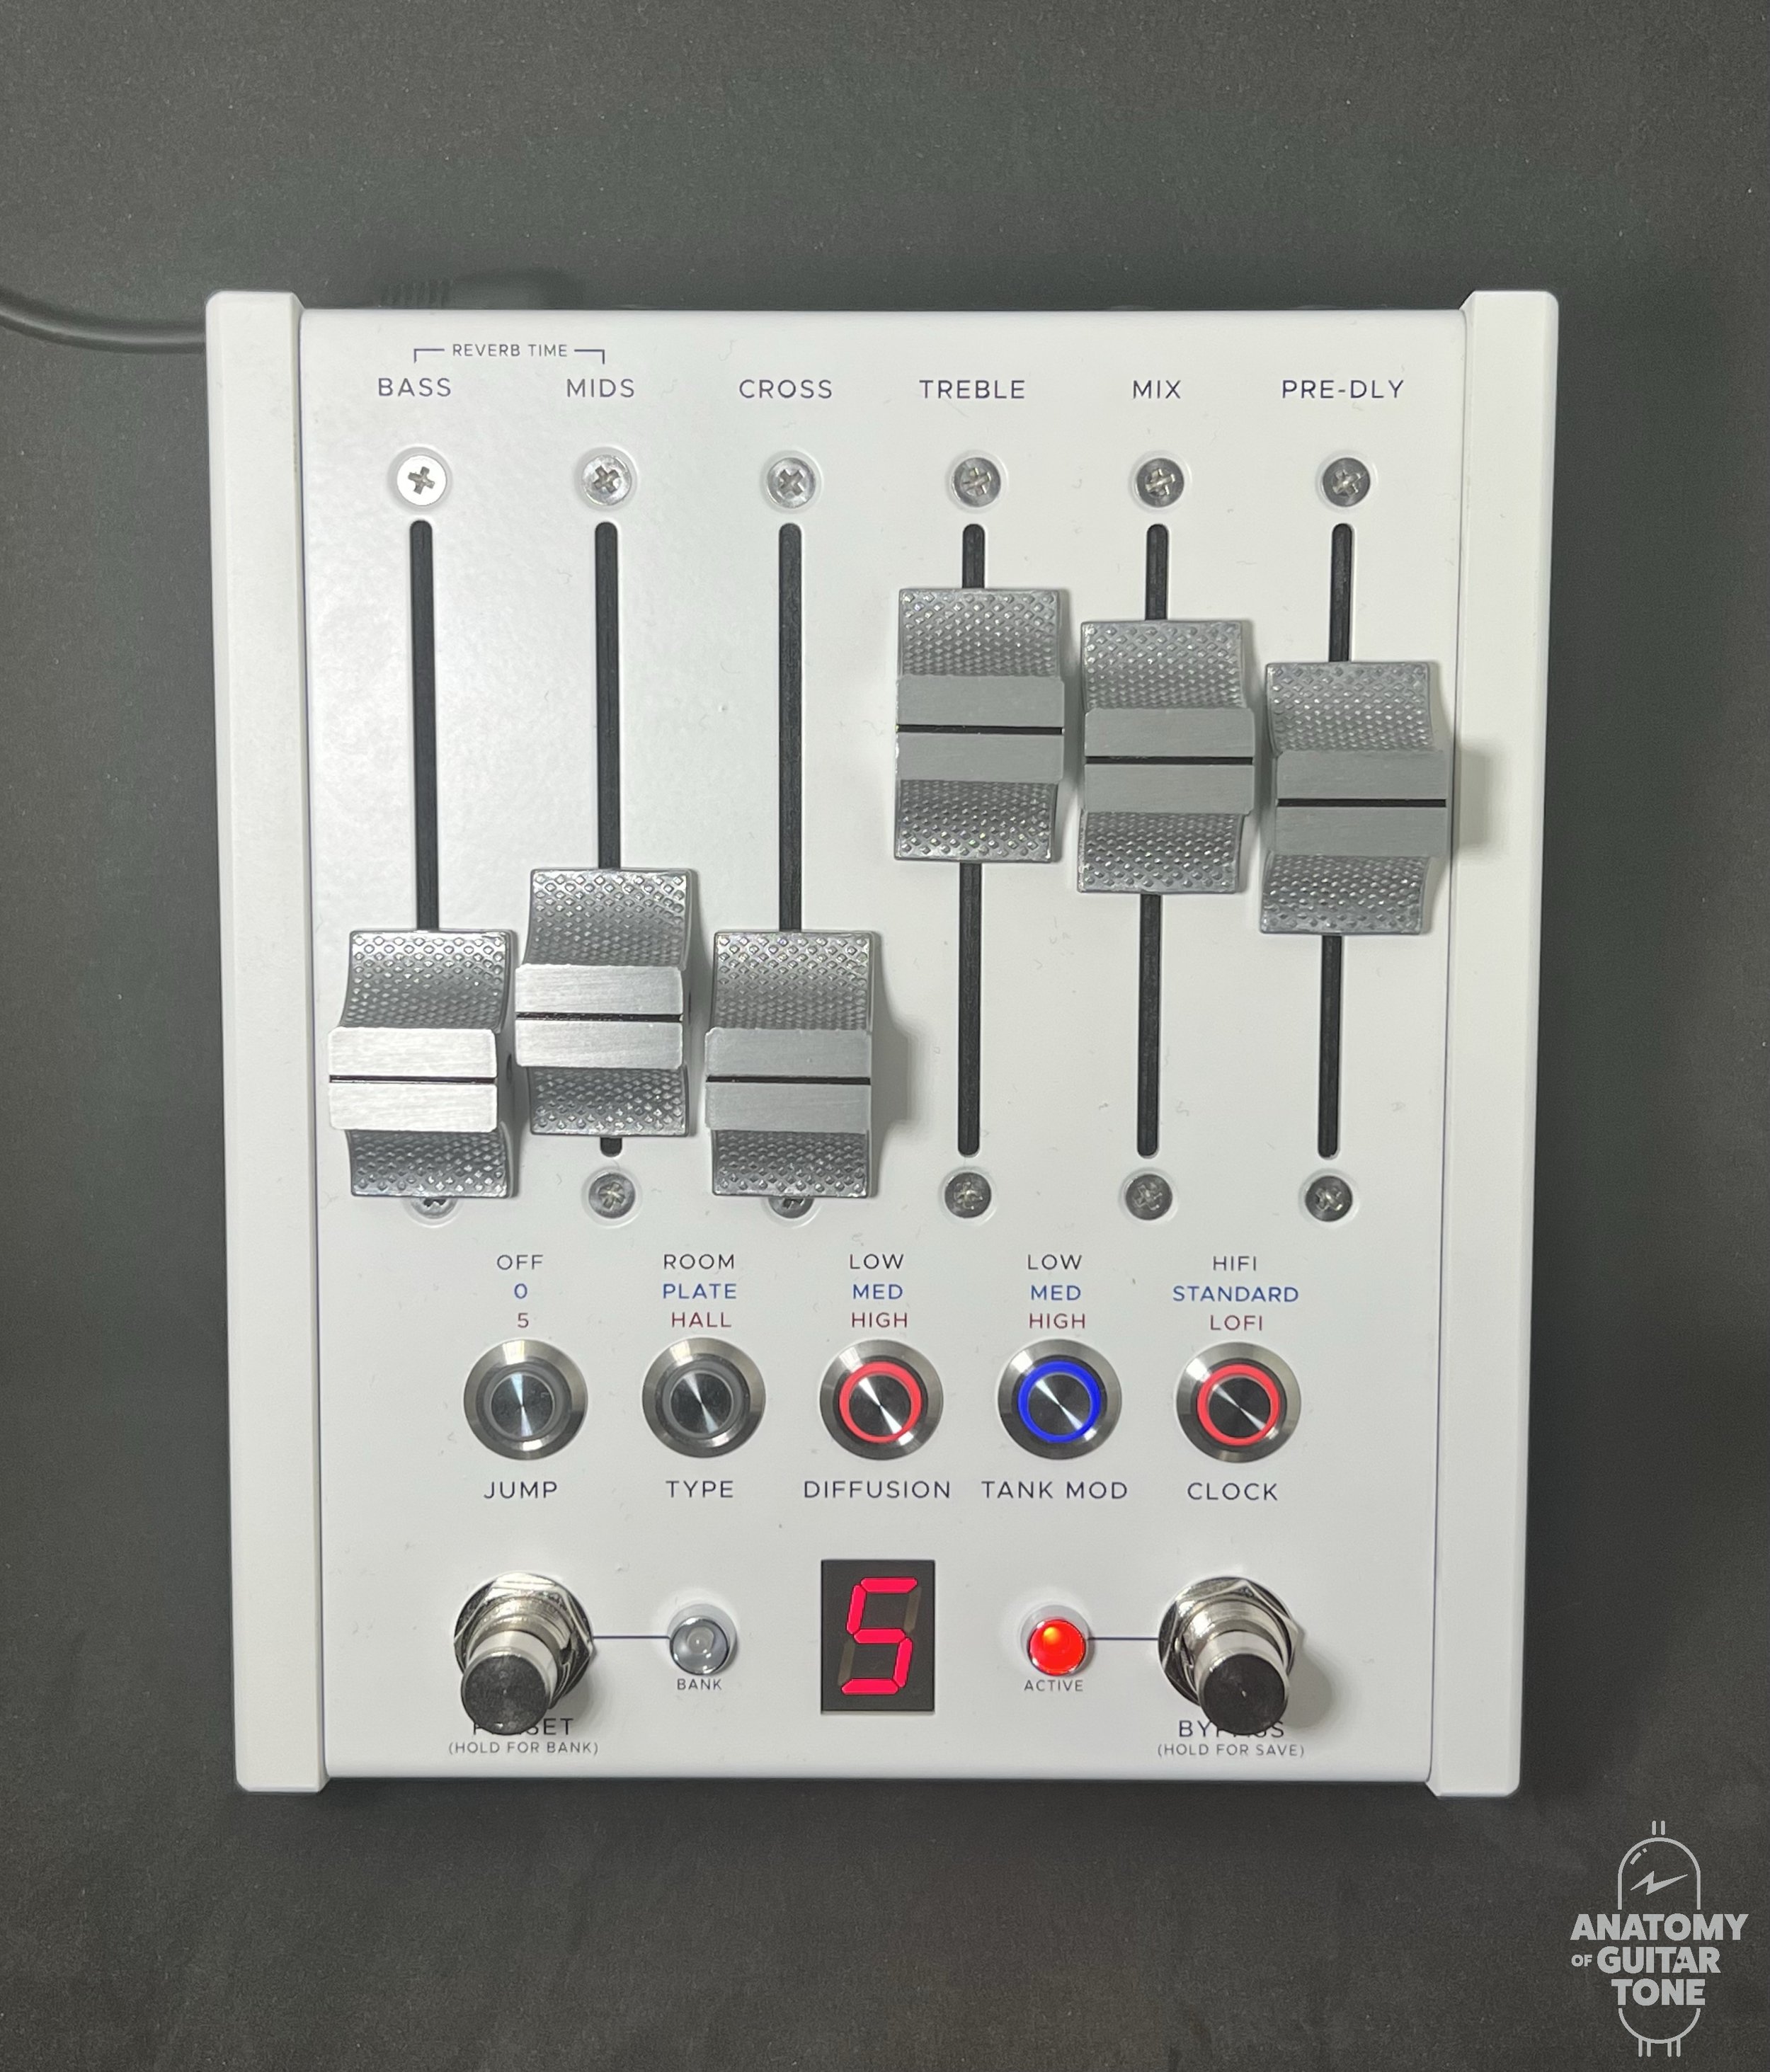
Some pedals will allow you to assign an expression pedal to length. But expression pedals allow you to control only one parameter at a time. And some reverbs only have one knob for length. The CXM 1978 allows you to tweak the length on several bands of reverb.
With the CXM 1978 you can set an infinite sustain on the bass frequencies only and set a different length for the mids or high frequencies. All are adjustable by faders. No submenus required. Those interested in ambient sounds will appreciate the three-dimensional sounds that can be created by adjusting the length or prominence of different bands of frequencies and length in reverb.
Tweaking frequency bands on reverb is not something most guitarists are used to having easy access to. Some reverbs have deeper menus that let you tweak a few extra parameters. But they’re usually not that accessible and not available as playable parameters.
Remote LARC-ation
Anyone who’s spent a lot of time in a higher-end recording studio has probably seen a LARC or similar controller sitting on the console. The LARC is a reverb controller that lets you tweak all the parameters. If you compare a LARC with the CXM 1978, you'll see a resemblance.
The CXM 1978 emphasizes tweakability—without your having to menu-dive like with other reverbs.
But whether you're using the CXM 1978 or another reverb, let me review a few things about “playing” reverb that will apply to most reverbs, even if it’s hidden in the sub-menu.
Pre-Delay
Pre-delay is the time it takes to hear the reverb after a note is played. You can set pre-delay very short so that the reverb is heard immediately, making it sound like you are right in the reverb, to very long, which is like playing in a canyon. When you scream into a canyon, the sound is dry until you hear the echo.
Pre-delay simply delays the reverberated sound. You can create tremendous slapback effects with a short reverb and longer pre-delay. It will sound different from a delay alone. It's not just slapping back your dry guitar signal—it’s slapping back your guitar signal through a room.
Pre-delay is crucial to creating a big reverb sound without taking over your signal. Setting the pre-delay to allow the attack of the dry signal to come through will enable you to add a healthy amount of reverb without losing the signal.

“Setting the pre-delay to allow the attack of the dry signal to come through will enable you to add a healthy amount of reverb without losing the signal”
You can get creative with pre-delay, too. Some reverbs allow you to tweak pre-delay in real time, with no jitter effects, allowing you to mess with perceived distance. If your reverb jitters when you adjust pre-delay, don't let that deter you. Jitter can be used creatively. For example, sometimes I lightly touch the pre-delay fader on the CXM 1978 as I play, creating an excellent warble effect.
Mix
A mix knob or fader is standard on all reverbs. This controls the balance of dry signal to reverb signal. You may not want any dry signal for ambient drones and soundscapes. The resulting sound is less about the original sound and more about the processed sound.

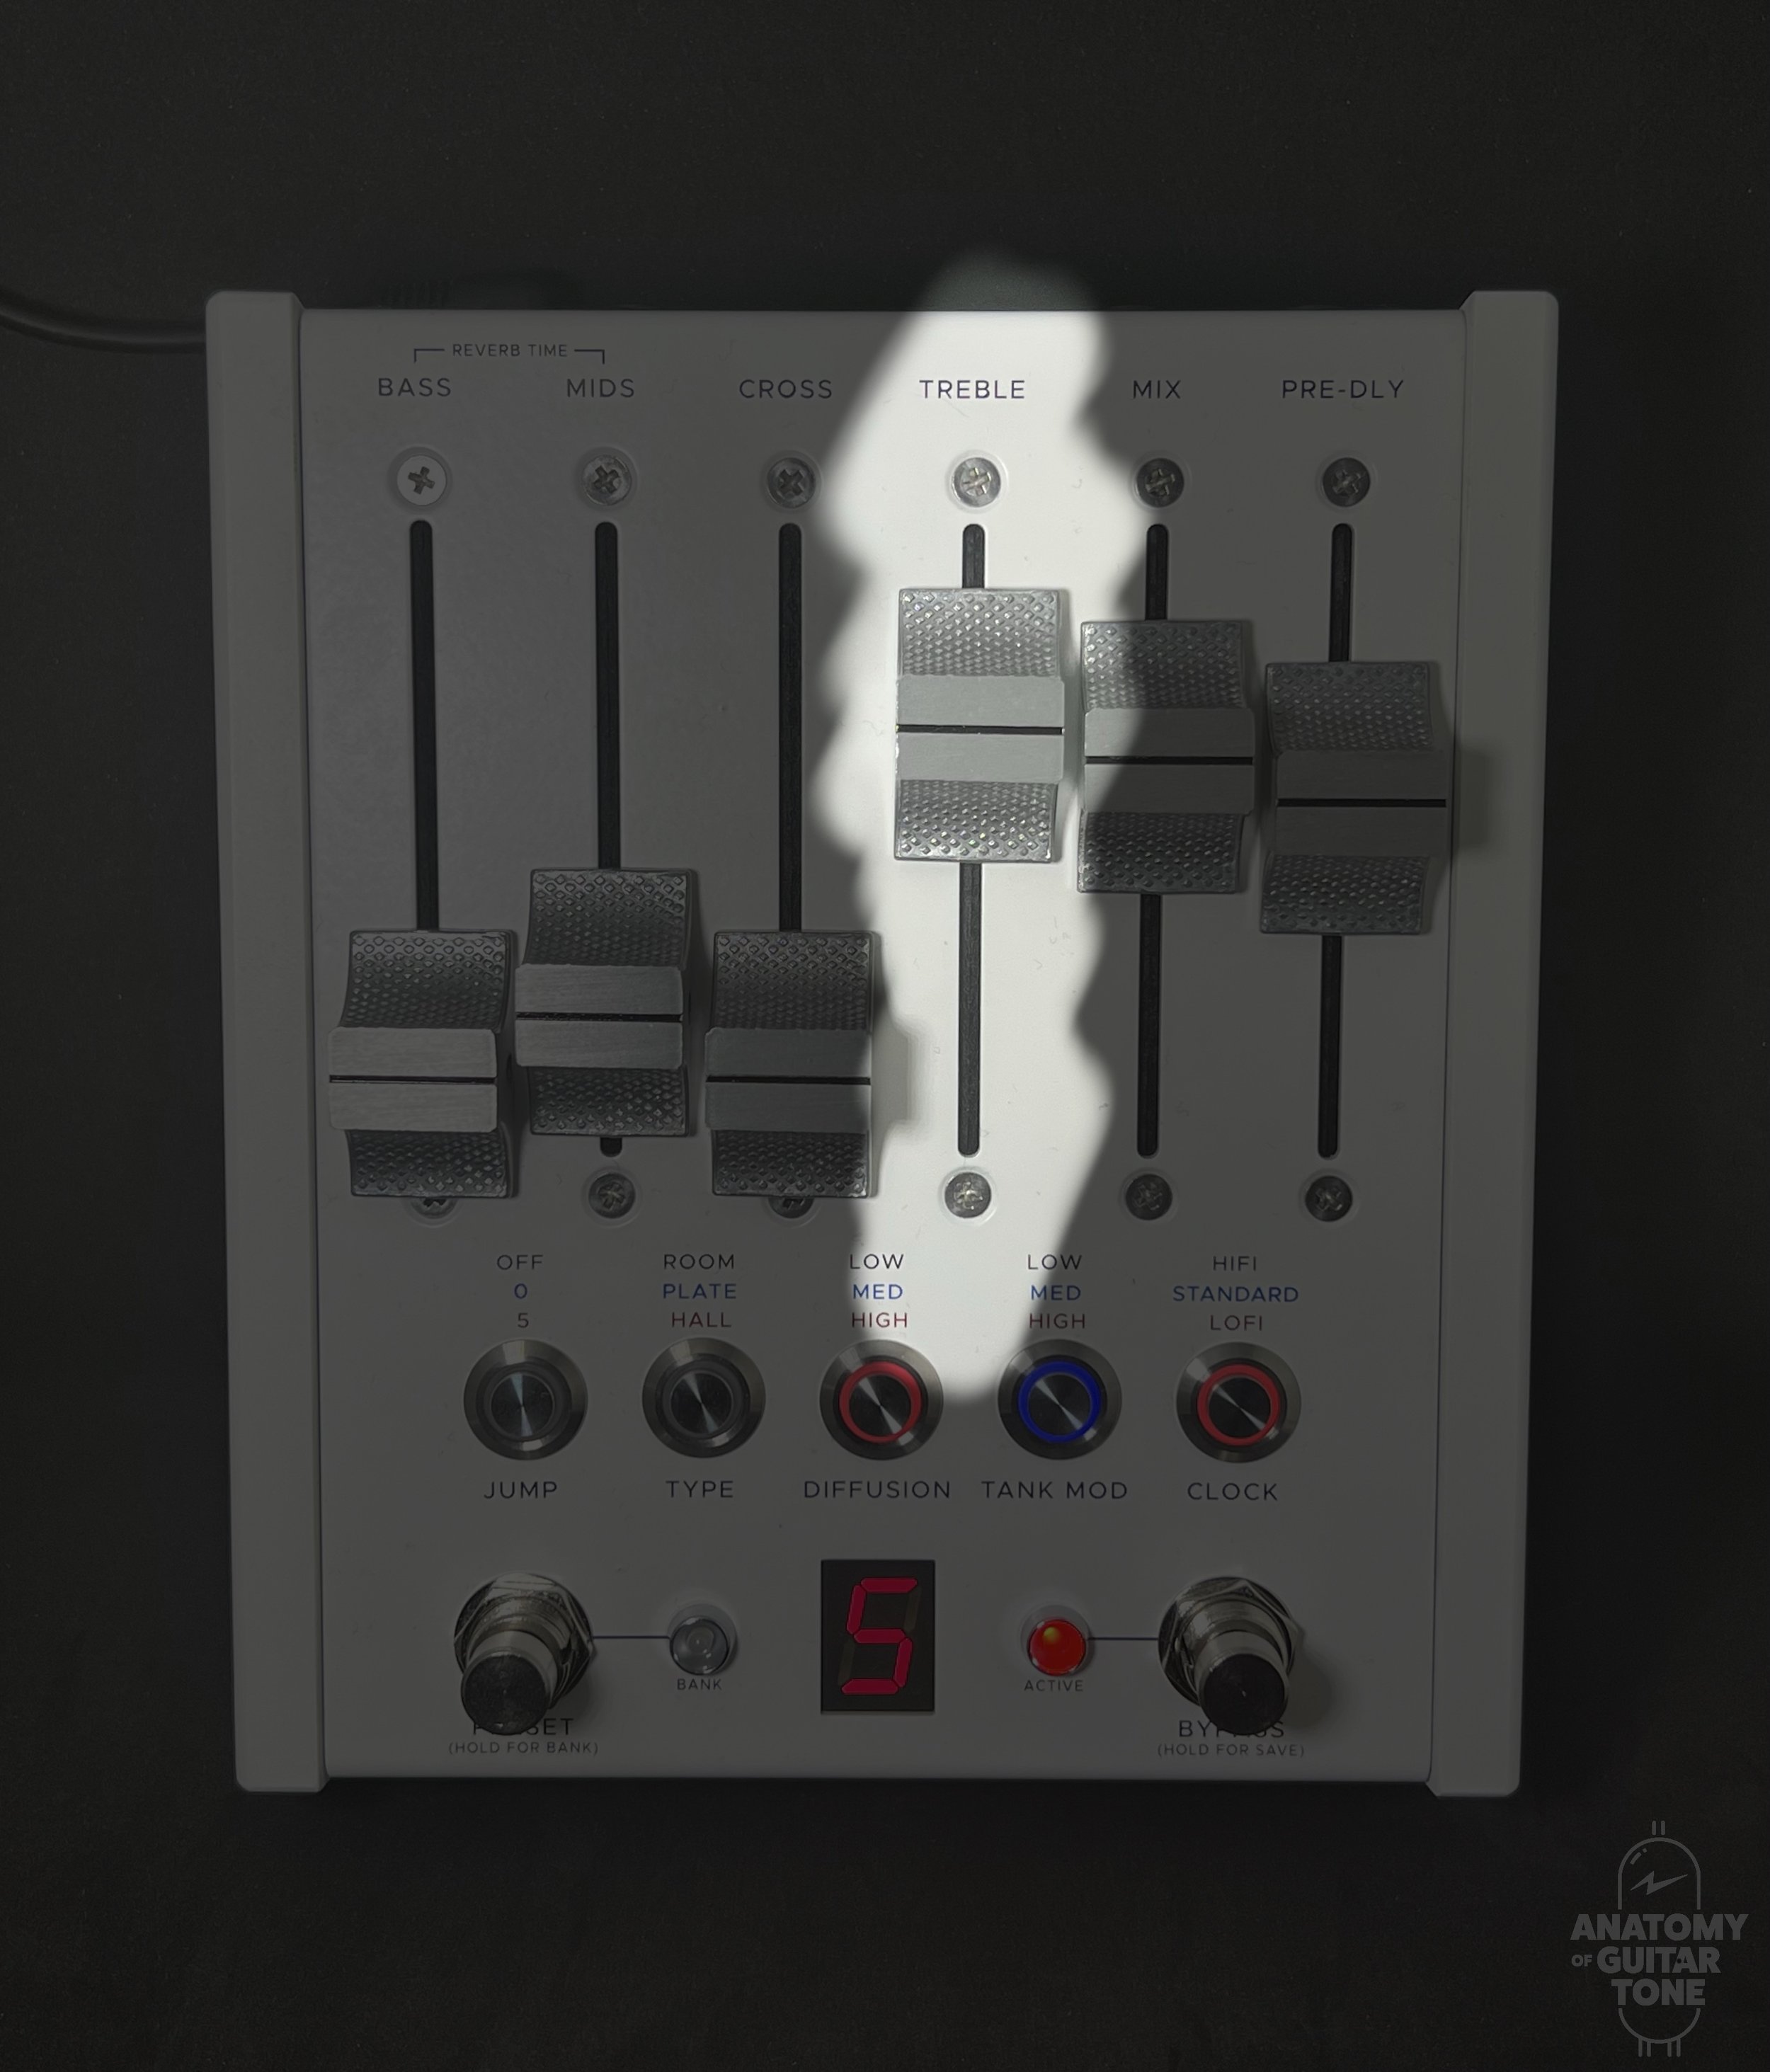
Treble
“Our ears will hear less reverb as the treble fader is brought down.”
The treble fader is often the first thing I tweak. Interestingly enough, it's also one of the biggest influences on reverb length. This is because it attenuates the high-end energy coming from the reverb’s core. This is a frequency my ears are sensitive to. It’s not that I don't like treble. I'm just choosy about how it's used. It’s why I reach for the treble parameter first, to define the overall treble character of the reverb.
Our ears hear less reverb as the treble fader is brought down, even if the mid or bass bands are higher. The treble parameter really sets the reverb’s vibe. On the CXM 1978, I can push the treble fader in ways I haven't been able to on other digital reverb pedals. It doesn't sound thin, cheap, or harsh. Whereas with other reverbs, I’ll suddenly have to adjust the treble to avoid sounding bad.
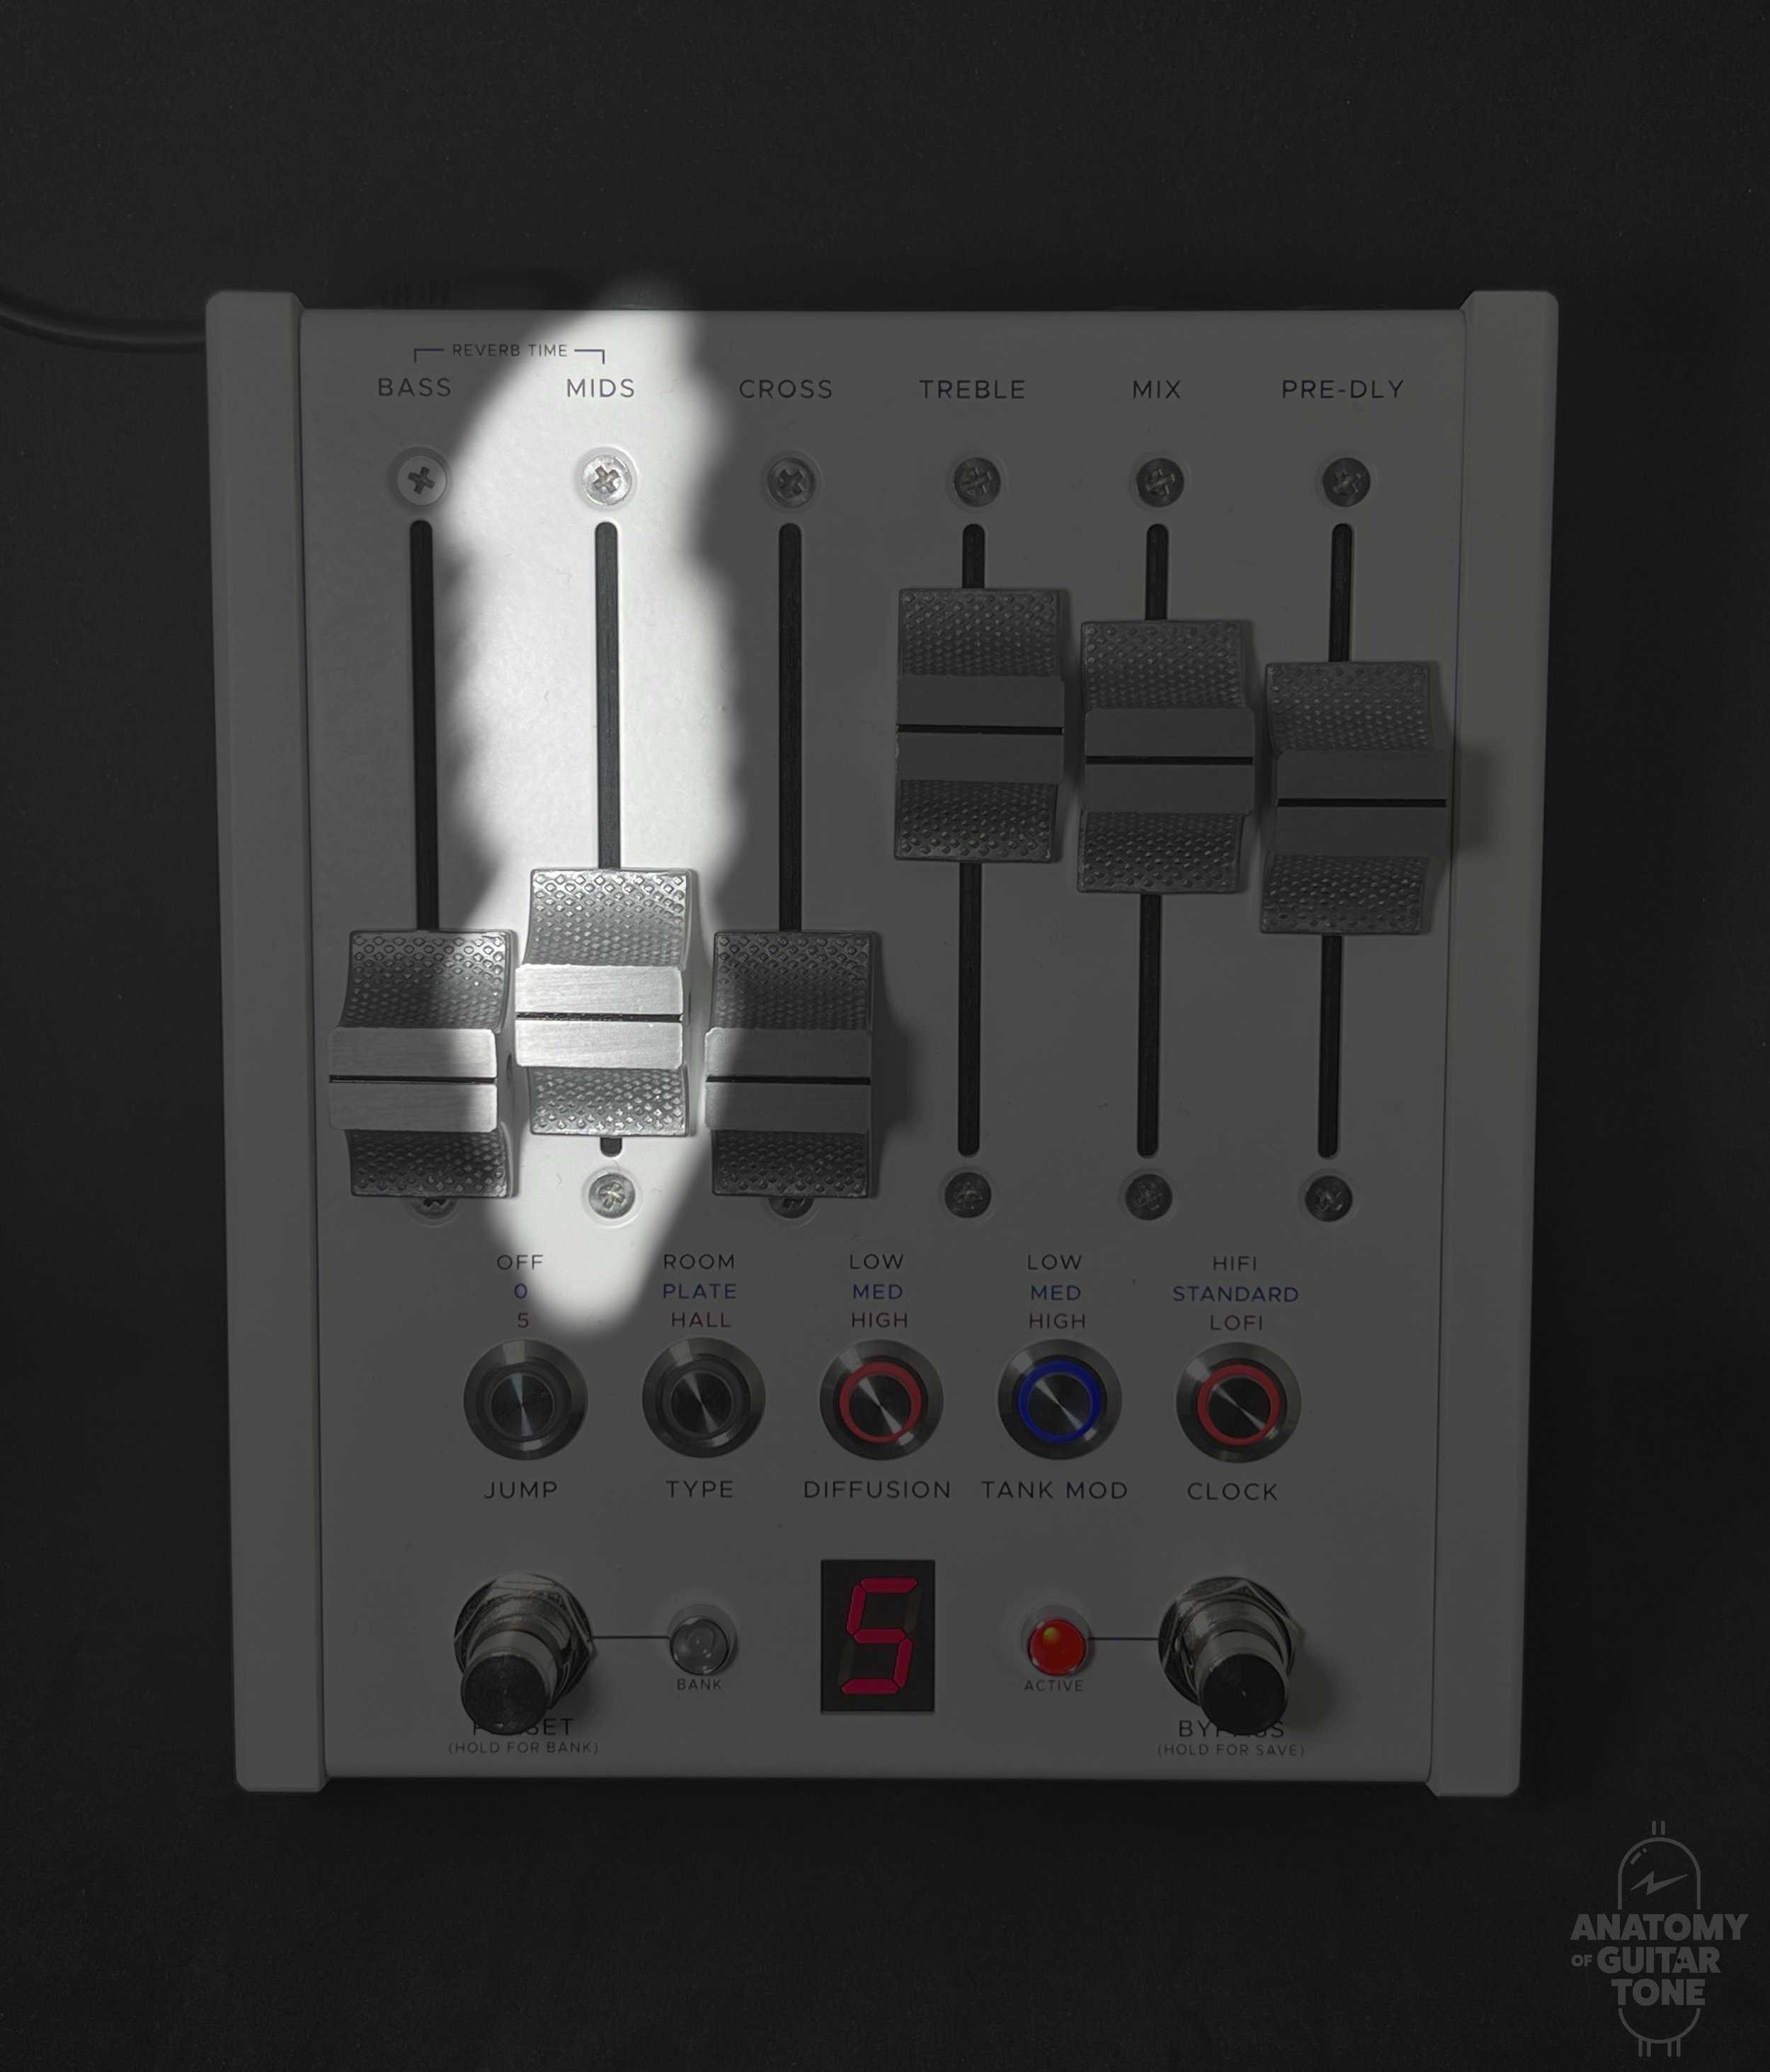
Mids
The mid-fader does exactly what you’d expect—adjust the prominence and decay of mid frequencies.
Bass
The bass fader adjusts the prominence and decay of the bass frequencies.

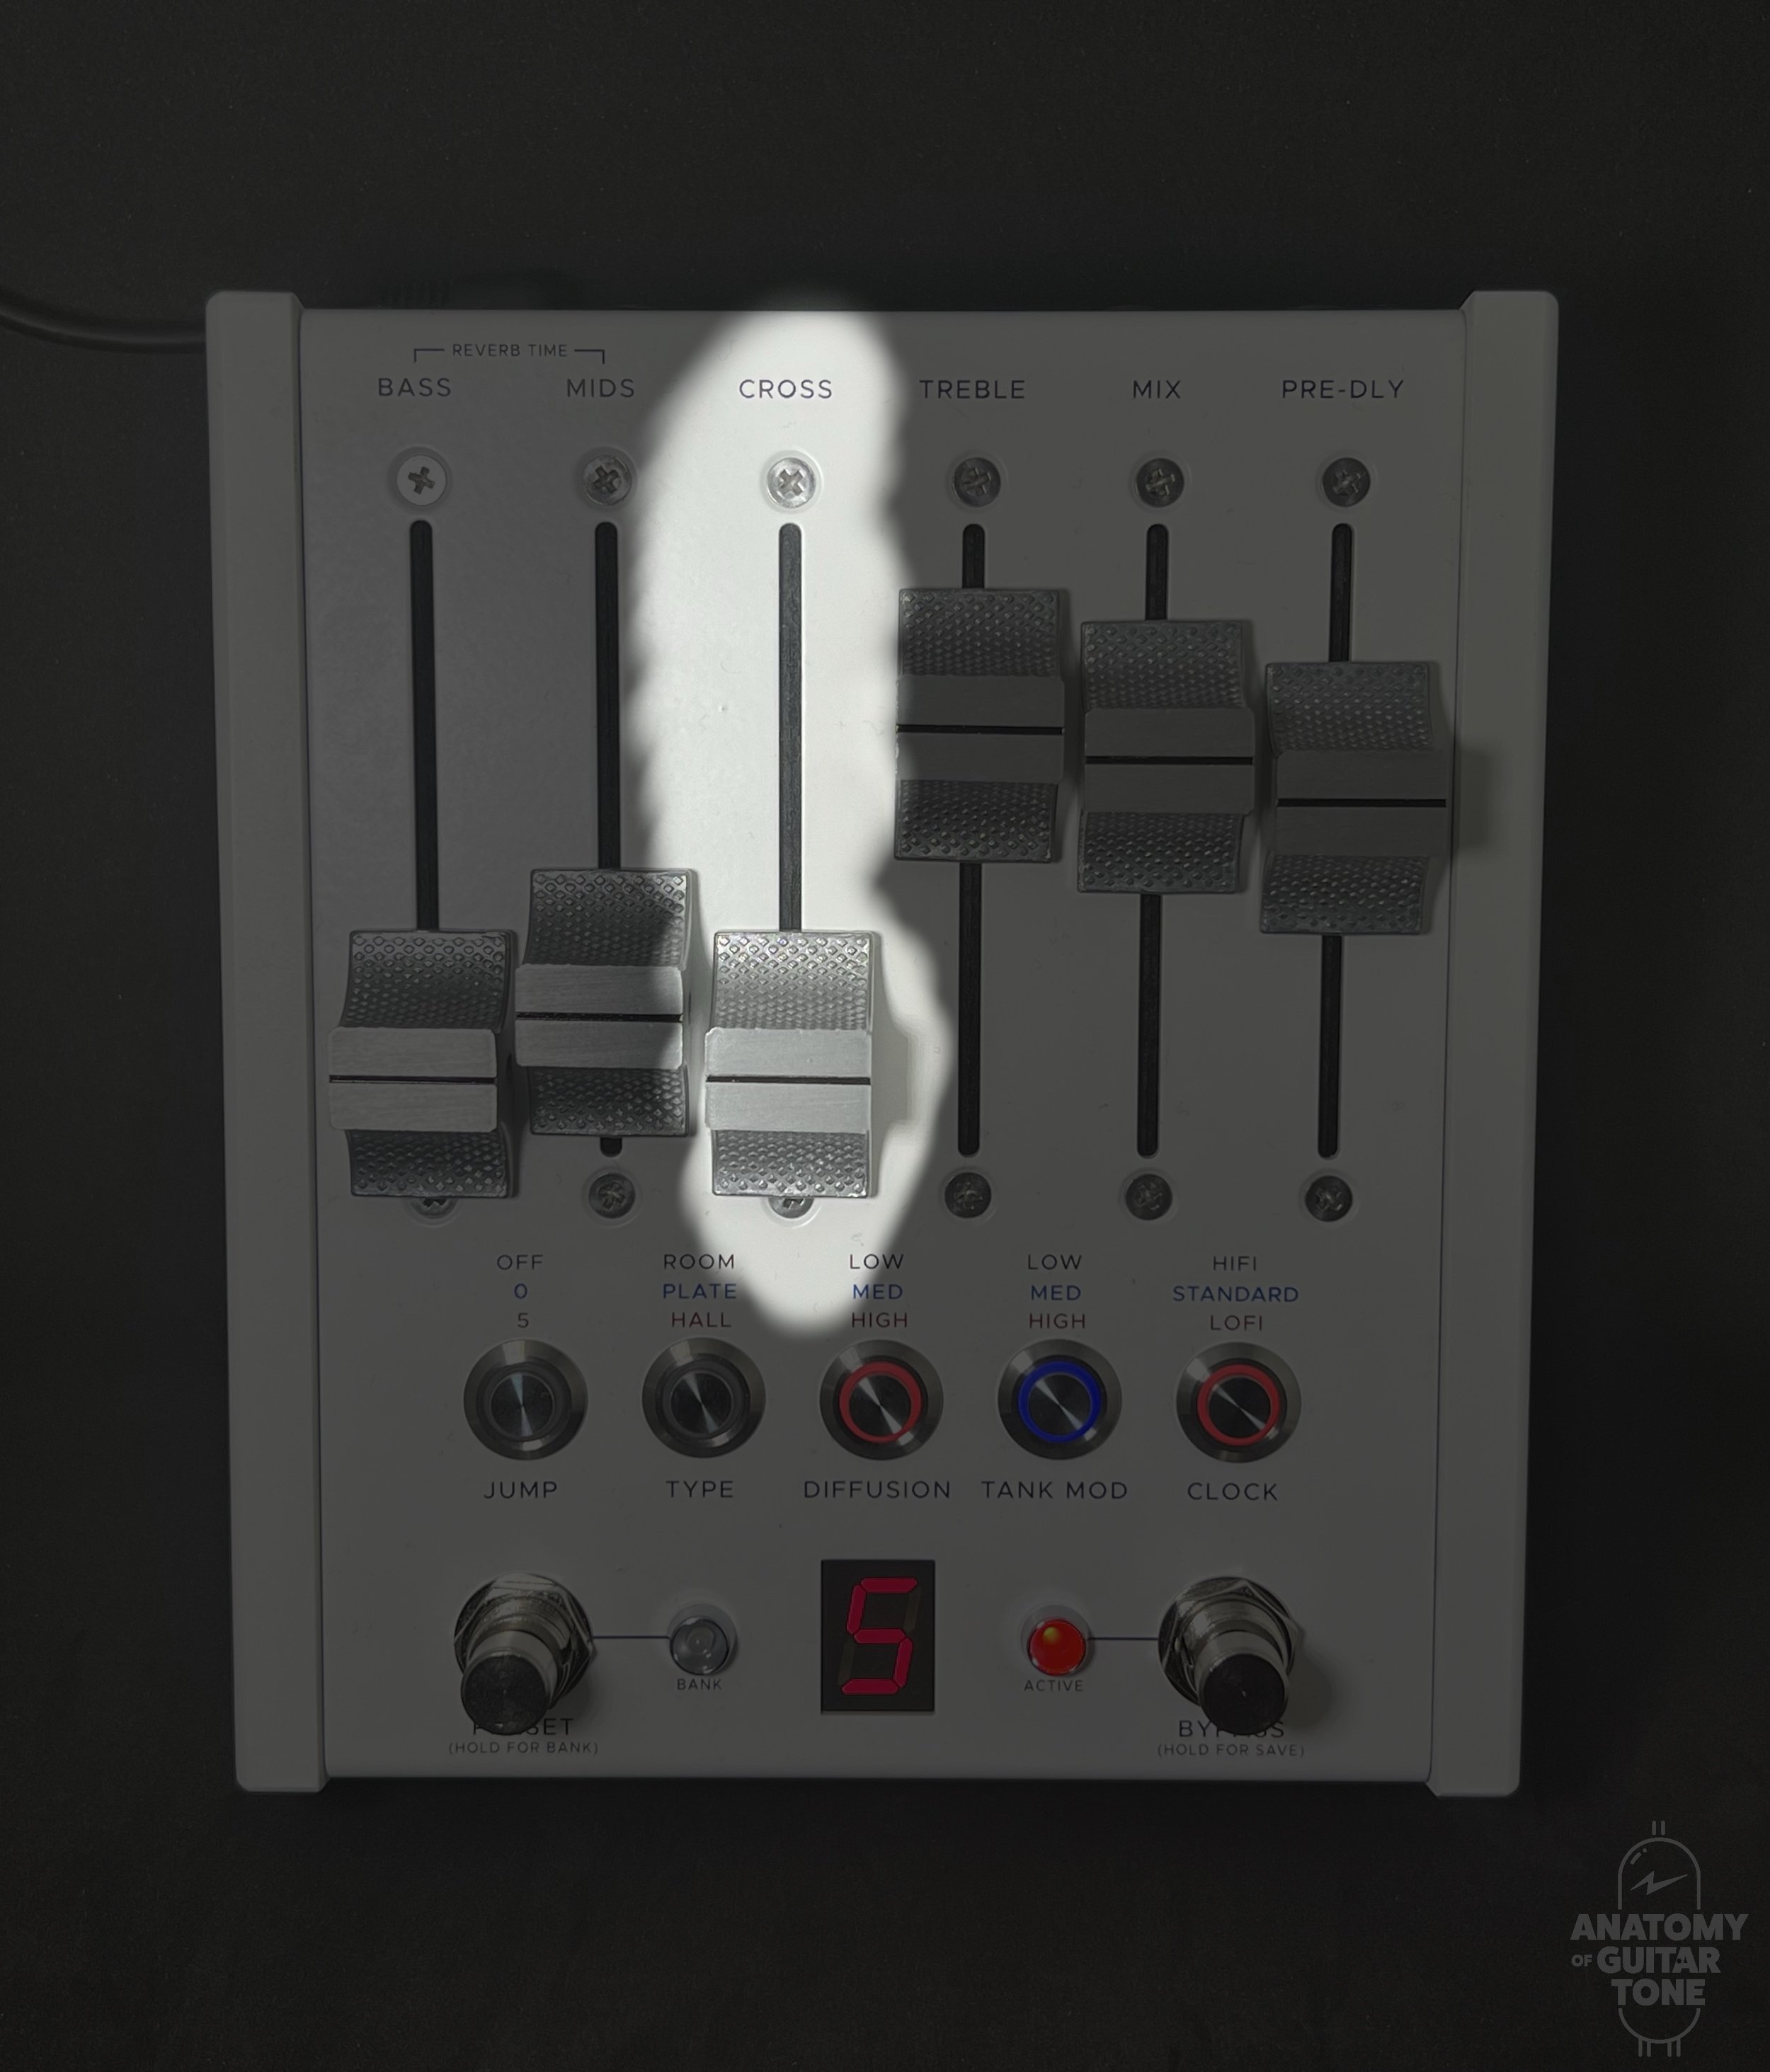
Cross Town Traffic
I didn't get too deep into the mid and bass faders because I want to focus on the crossfader, which confuses a lot of musicians and engineers. “Cross” stands for crossover, and it sets the dividing line on the frequency spectrum between bass and mid frequencies. Not all reverbs have this capability. The CXM 1978, like the original Lexicon 224, gives us the option and easy access with a fader.
“Cross-function lets you set different reverb lengths to different frequencies.”
Cross-function is simple: it lets you set different reverb lengths to different frequencies. For example, you may want a long reverb trail in the mids at around 800hz but not as long a trail at 200hz. So you set the crossover point for the bass frequencies at around 200hz. This sends all the frequencies 200hz and below to the bass fader, which can be set for less reverb decay.


Maybe you want a lot of reverb trail or infinite sustain in the bass frequencies (which sounds incredible with a synth like a Prophet or OB-6), but you don't want many high mids to pop out. So you’d turn up the bass fader until the sustain sounds good. Then you would adjust the mid fader down and play with the crossfader to find the best crossover frequency (that is, the frequency above which you don't want infinite sustain).
I've seen a lot of creatives gloss over the cross function. Using cross can allow you to shape a large reverb without its taking over the whole mix. Instead, you're carving out the space where you want the reverb.
Just Before DAW-n
You might be thinking, well, faders are nice, but how can you tweak them in real time while recording guitar? One solution is to place it on your recording desk, at a height that's easy to touch. Some of the techniques I’m about to mention don’t apply so much to live situations.

One thing I've been doing lately is to enable my primary signal into a UAD Luna. This means my guitar or synth sound has no reverb. On the record-enabled channel in Luna, I create a send out of my Apollo into the CXM 1978 either using a Radial Reamp or straight in, since the CXM 1978 can accept a balanced signal. (Unfortunately, not all reverb pedals can receive a balanced signal. Check the manual.)
The CXM 1978 outputs then get sent into my API 312 preamps. While recording guitar, I don’t intend to record the reverb. I’m just monitoring it. (While that's my intention, I always hit record in case something cool happens.) By monitoring the reverb's vibe, I can go back after I record and tweak the reverb in real time.
After my guitar or synth part is recorded, I have the same live send from the channel in Luna going to the CXM 1978. Now I have total creative control over the reverb parameters and can record the performance.
Tip: I usually have the CXM 1978 or other reverb set to fully wet. This allows me to blend my no-reverb signal with the fully wet signal if I need it inside my DAW. It's basically a wet-dry blend with two recorded tracks.
This has become my preferred setup for recording, as it gives me a lot of flexibility. For example, I can capture a reverb performance if something special happens, I can "reamp" the performance to tweak the reverb in real time, and I have control of the dry-wet mix after the fact. Also, the reverb is isolated, so I can experiment with compression from my Purple Audio MC77 or use EQ.
Zero Calories
I should also mention that one thing I love about the Luna is its zero-latency monitoring. Luna also integrates with outboard gear really quickly for this processing style.
Another advantage of the Luna send approach is that I can make a couple of passes with different reverbs and stack them on top of each other. For instance, I may choose two different reverb types and lengths to stack for an ambient tone.
Diffuse Me
The best way to think of diffusion is the difference between an empty room and a room filled with furniture and paintings on the wall. If you clap your hands in a room with nothing in it, you will hear the sound bounce around like many little echoes. As more furniture is placed in the room, you hear fewer little echoes. Adding more furniture is like adding more diffusion. You are diffusing the reverb.
By adjusting the diffusion on a reverb, you can adjust how bouncy the reverb sounds. This becomes really apparent on drums, which are often best with more diffusion. But some applications sound better with less diffusion. It's a creative decision. Either way, make sure to check the diffusion on each sound you create.
Space Cowboy
You can choose from several standard reverb styles or spaces on many digital reverbs. Room, chamber, plate, and hall are all fairly common. The CXM 1978 gives us room, plate, and hall. Beware of reverbs that do too much. Most digital reverbs are not good at spring reverb. I haven't found one I like, honestly. I'm still using analog spring reverbs.
Parallel Processing
To create a parallel wet/dry mix in a live setting, I create a parallel chain using an AmpRX Apparition pedal. It's a four-channel true bypass looper with adjustable gain on each channel. But unlike most bypass loopers, each channel is parallel, not in series, which allows you to keep your peas and potatoes separated.
For example, I can have two different delays, and two separate reverbs onstage that are blendable and parallel. The Apparition is like my special effects brain for ambient gigs.
This pedal is mono-only, which may be an issue for some of you. I almost always run mono onstage these days.
Parallel processing is a powerful tool that gives you more clarity with big-sounding effects. For example, you can create cavernous sounds but still retain some definition. In series, stacked delays and reverbs can cause a sonic pile-up. Keeping spacial effects in parallel allows you to expand the space without cluttering the sonic environment.
For those of us who record a lot, processing in parallel is business as usual. But for us pedalboard nerds, it's not often an option.
Pre-Delay
One thing I like about pre-delay is that if you set it right, you can make notes bloom after you play them. They pop out. It's even cooler using the lo-fi mode on the CXM 1978. The pre-delay not only works as a pre-delay in this mode but also alters the sample rate of the reverb, which creates an unearthly effect. Adding a little modulation extends this other-worldy tone even more.
The CXM 1978 is made for experimentation. I can't imagine getting these sounds with another reverb (except the 224, haha, but that's, like, $5,000).
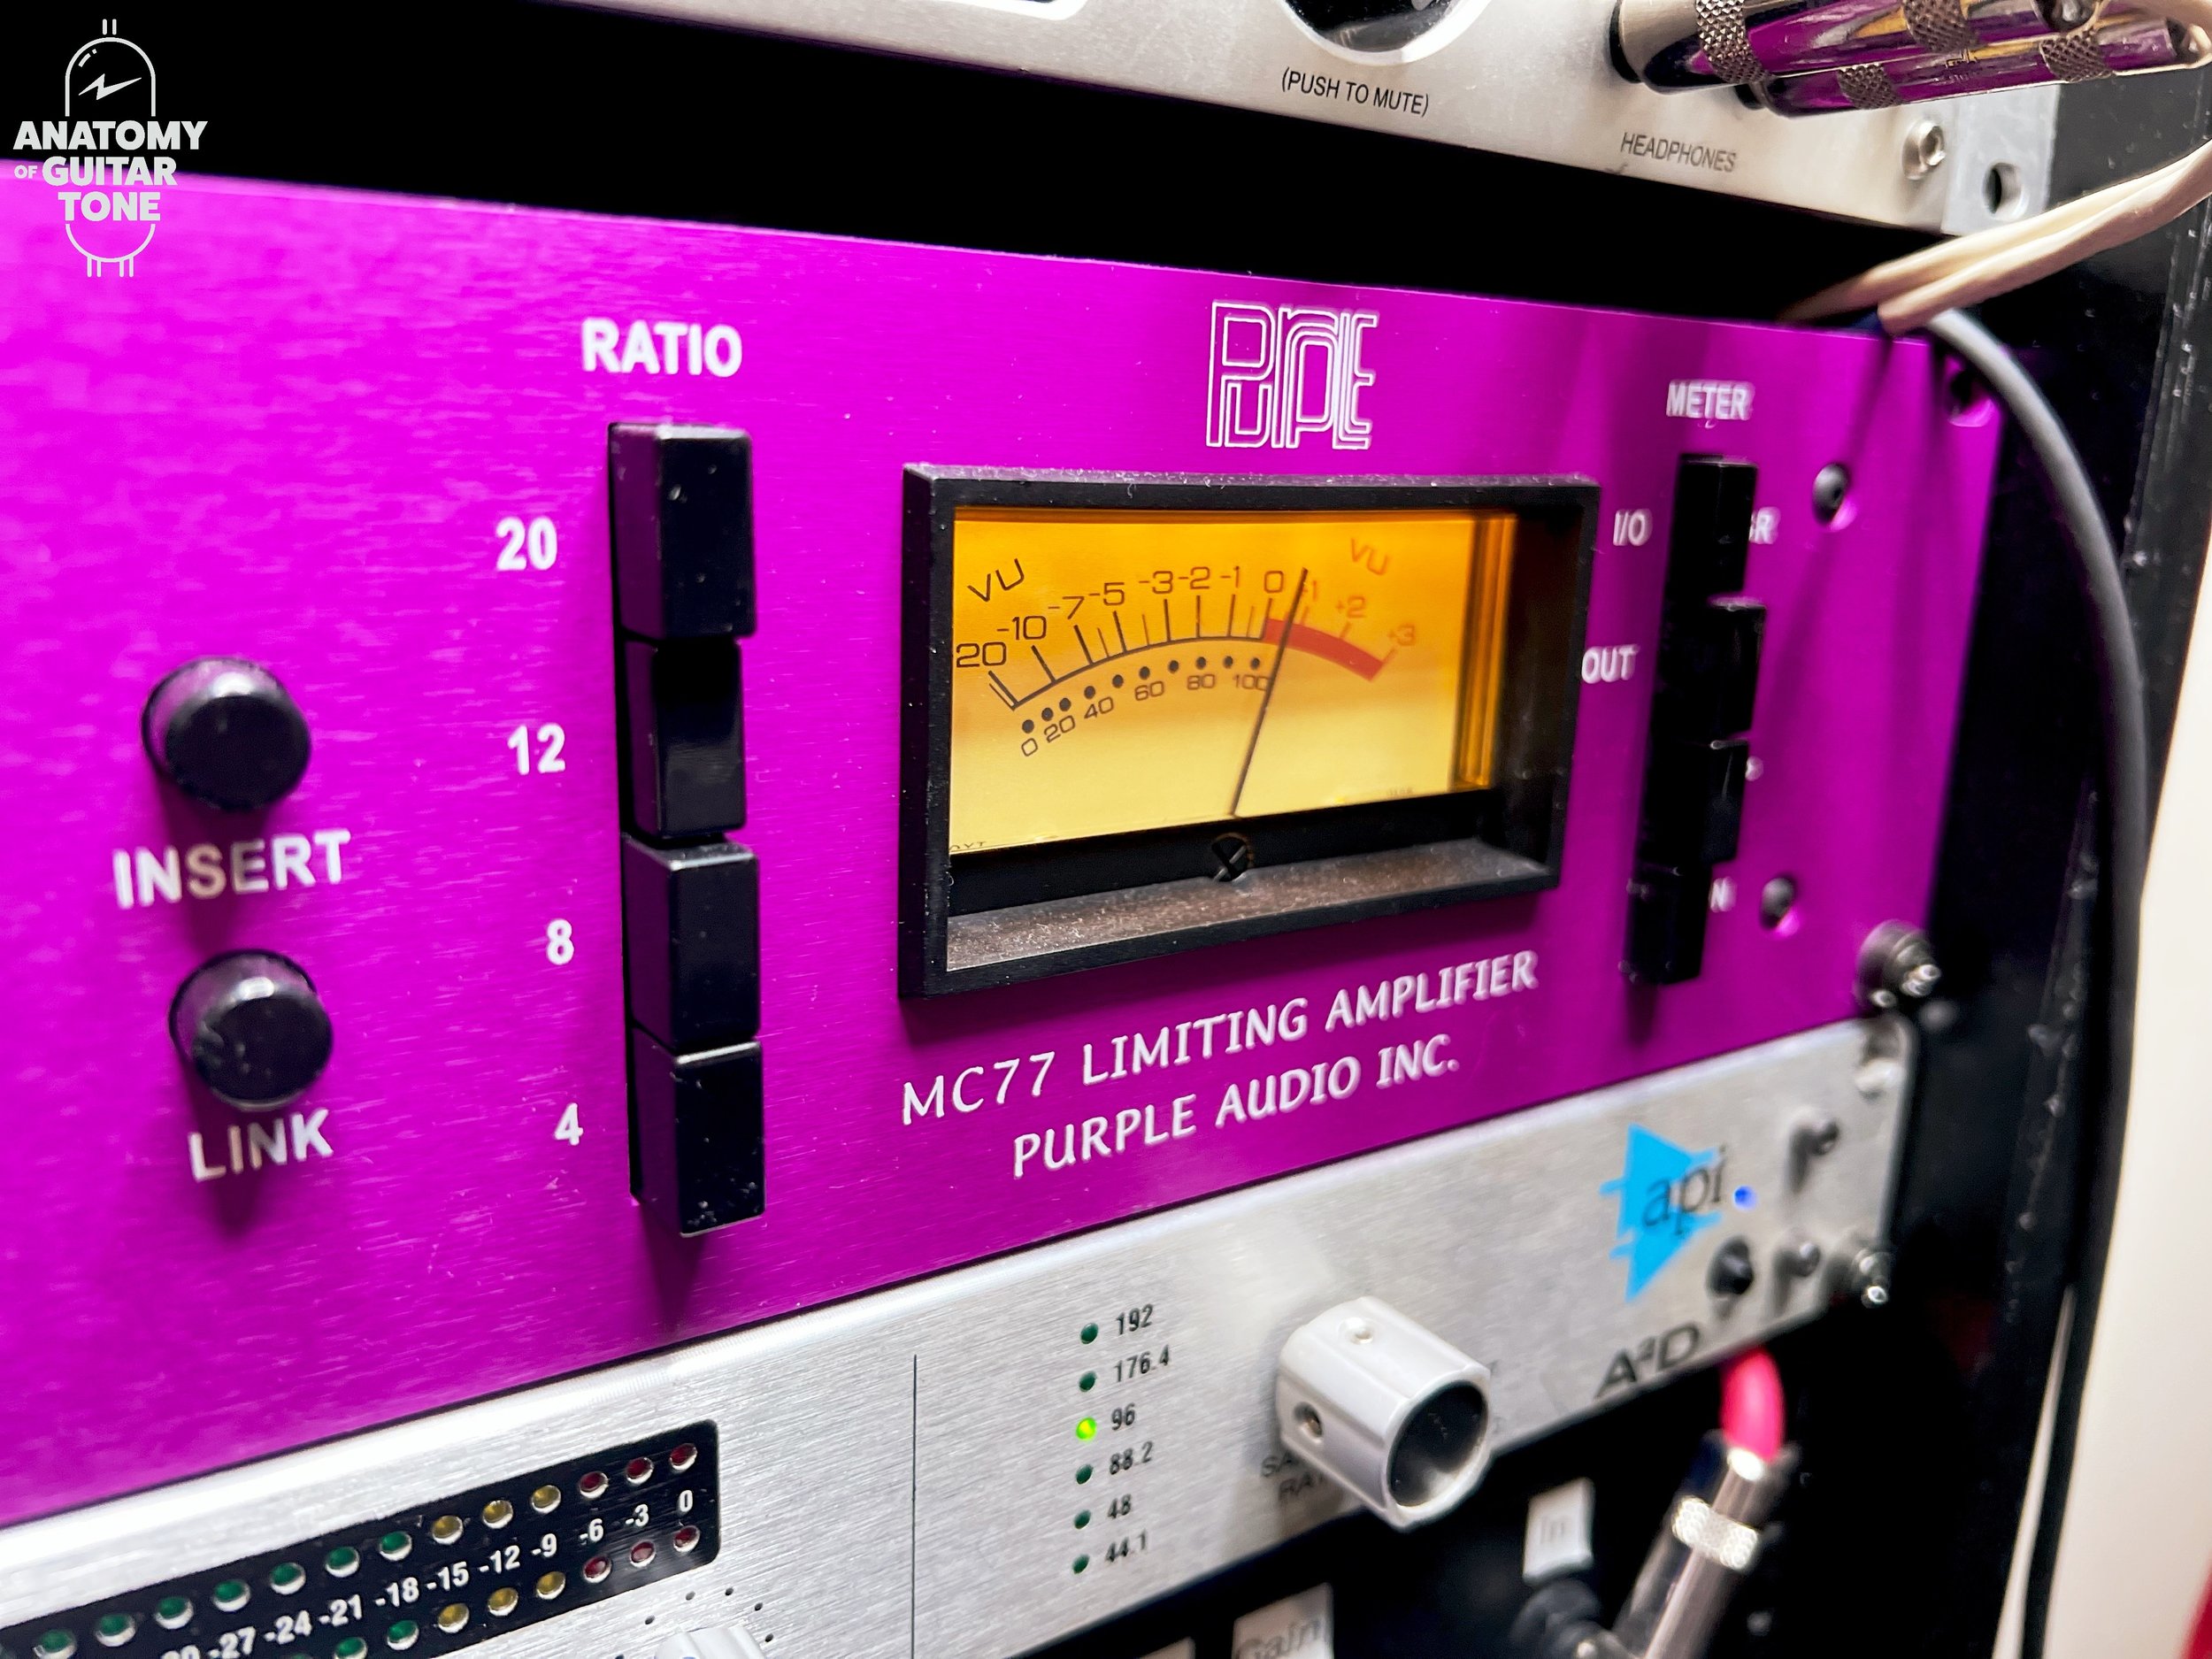
Compress Yourself
“When the reverb begins to self-oscillate, levels can spike. I solve this by using a compressor before my A/D converters.”
When "performing" with reverbs, sometimes the levels can get a little unruly. And when the reverb begins to self-oscillate, levels can spike. I solve this by using a compressor before my A/D converters. My all-time fave is the Purple Audio MC77, an improved 1176 compressor. I'm a big fan of using a compressor before converters instead of after, for tracking purposes. Sure, plugins are good, but there is still a difference.
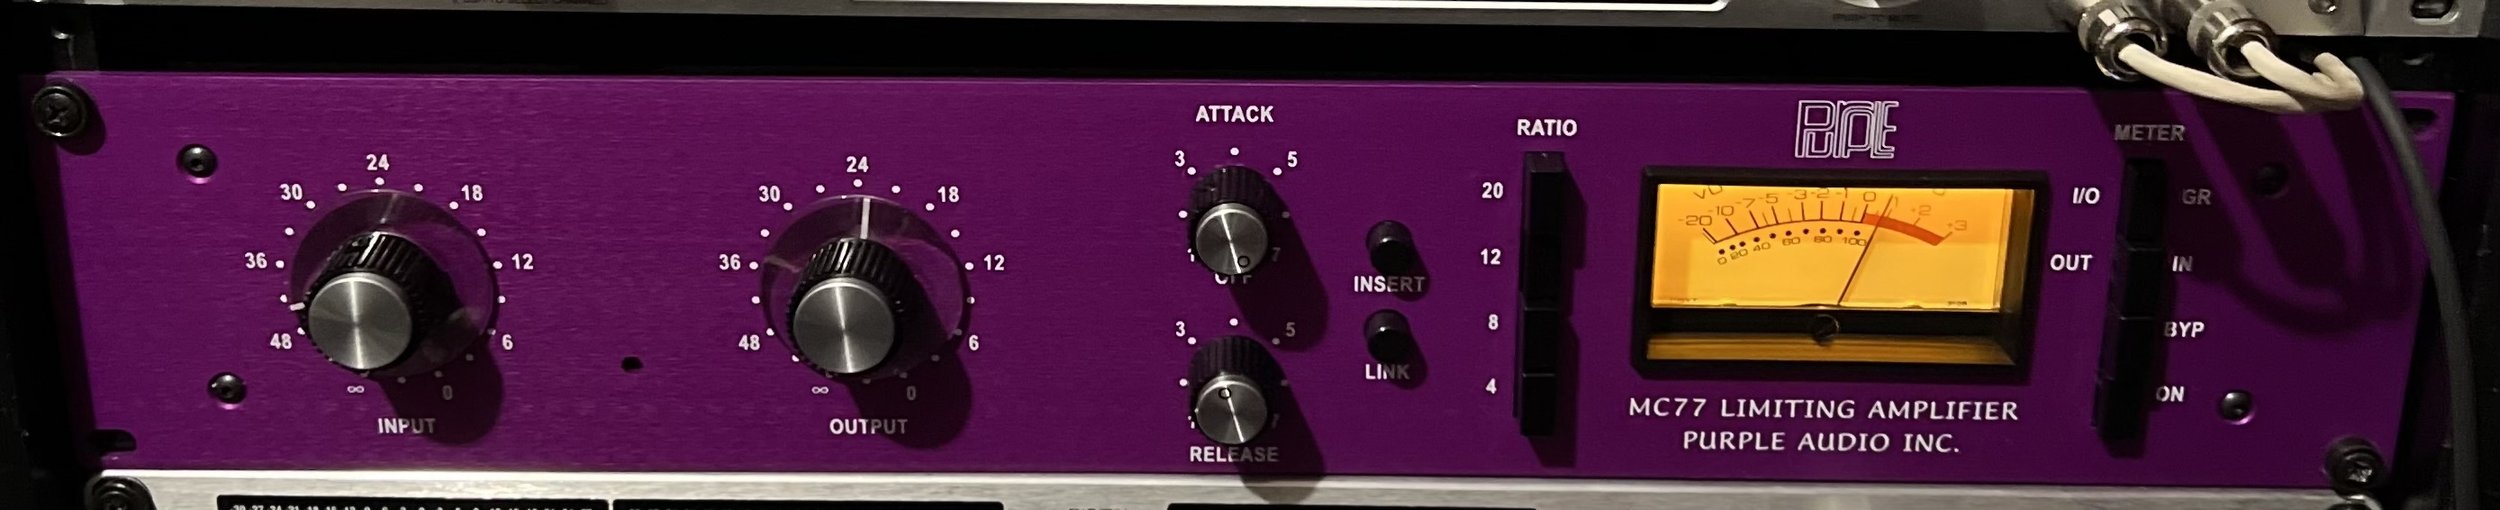
Often I'm not adding a lot of compression—just enough to control the signal and color the tone. Having some analog gear in my chain makes things sound better. There used to be several points in the analog realm where natural compression would happen. In digital, we have to re-create that.
In this case, it prevents clipping when the reverb starts building up. The MC77 (the analog compressor, not the plugin) is much more natural than plugins, meaning you don't hear it working. But the tone and color are always welcome, and playing the faders on the CXM 1978 will not result in overload.
You can get digital clipping on the CXM-1978 when pushing the low fader into self-oscillation. This is when the bass time fader is all the way up. But back off this fader a hair and the signal will not distort, but it still sings.
In Closing
The Chase Bliss CXM 1978 is a creative pedal for those who want to explore sound manipulation in a live setting or studio environment. I can't imagine living without it now, as I've grown used to having the option of hands-on, easy reverb manipulation.
“The Chase Bliss CXM-1978 is a creative pedal for those who want to explore sound manipulation.”
I’ve made a video that further demonstrates the ideas and sounds of performative reverb: